Setup instructions - AeroCount PM Detector
Welcome to the instruction page for installing your AeroCount particulate matter detector. If you have not yet read the user manual, it is important that you first read the chapters 'Safety regulations' and 'Introduction & Application'.
On this page we go through all the steps of the user manual in detail, one by one. The steps are the same, but they are more extensive and more clearly defined. There are also tips on how to approach the installation differently, in case there are reoccurring problems.
Table of contents
Click on a chapter to go there
Step 2 - Connect the power cable to the adapter
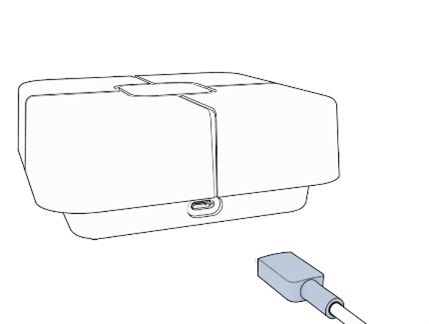
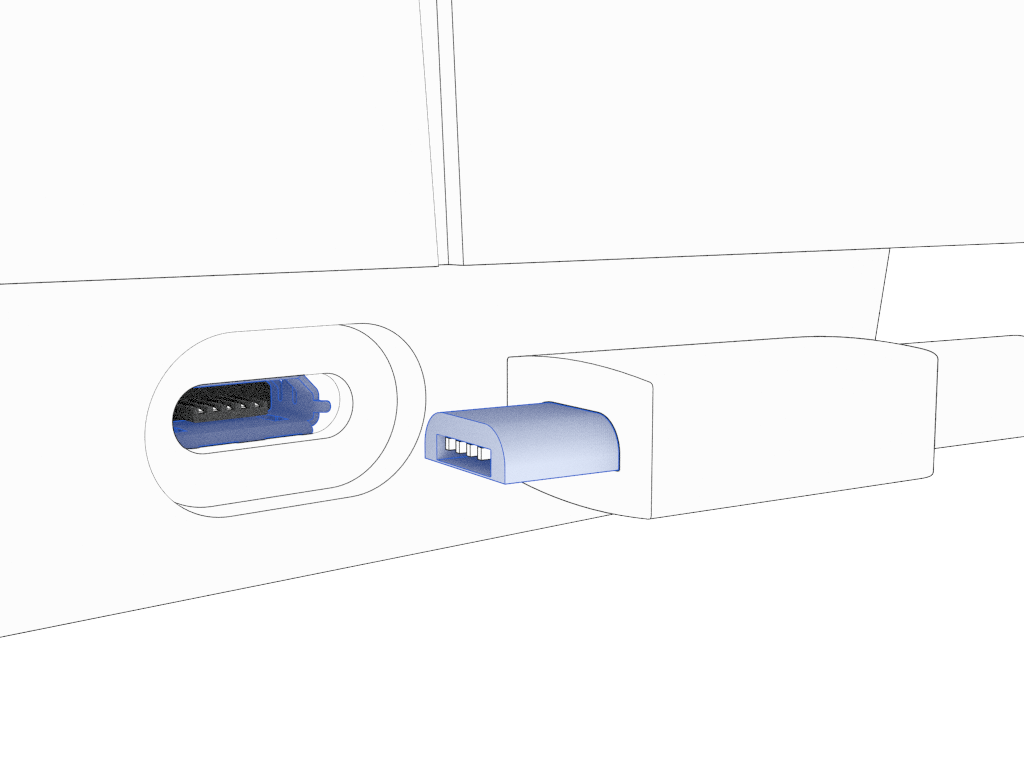
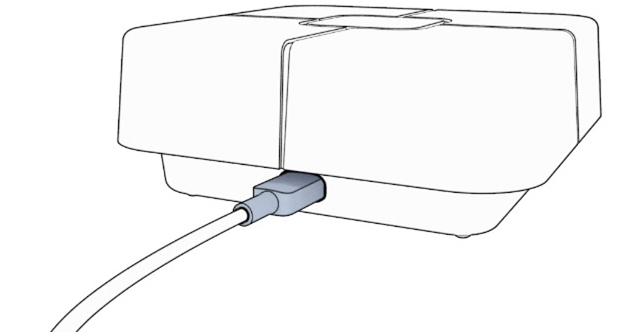
Step 3 - Connect the power cable to the AeroCount PM detector
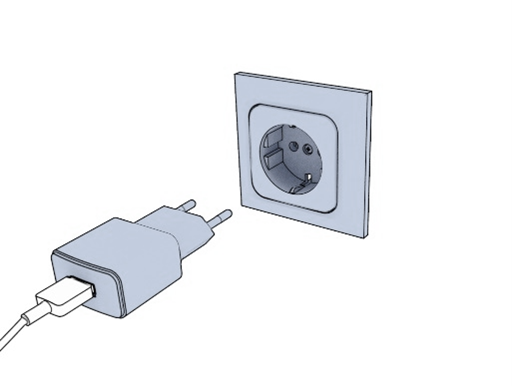
Step 4 - Plug the adapter in a suitable outlet
Step 5 - Connect the AeroCount PM detector to your Wi-Fi network
Step 6 - Place the device in a suitable location
For an overview of only the Frequently Asked Questions on this page, without any instruction steps: see the FAQ page.
The AeroCount PM detector is supplied with an adapter, a USB power cable and a mounting plate. These accessories are shown below. The corresponding names are:
- AeroCount PM detector
- Wall mount
- Power cable (USB-A to micro-USB)
- Adapter
- Reset button
- Air inlet
7. Magnet holder
8. Temperature and humidity sensor
9. Screws for valve
10. Air outlet valve
11. Status LED
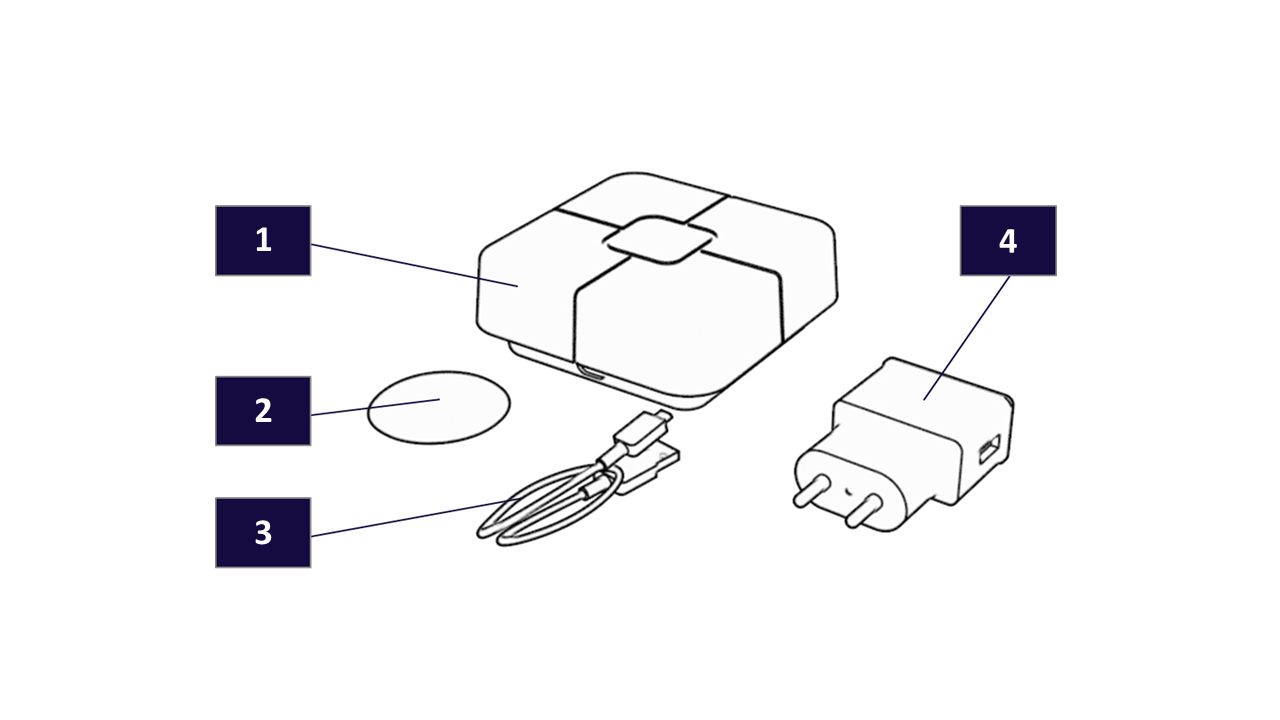

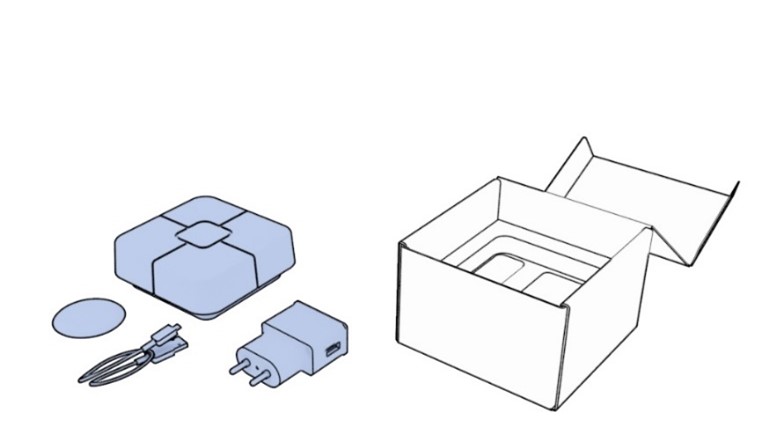
Check whether all necessary parts are included in the delivery of the AeroCount PM detector. There are 4 components in total:
- AeroCount PM detector
- Adapter
- Power cable (USB-A to micro-USB connection)
- Magnetic wall mount
Remove parts 1, 2 and 3 from the packaging, these will be used later. Component 4 can be left in packaged for now, it is only required when the AeroCount PM detector needs to be mounted vertically (such as to a wall or window).
If one of the parts is not included, please contact us.
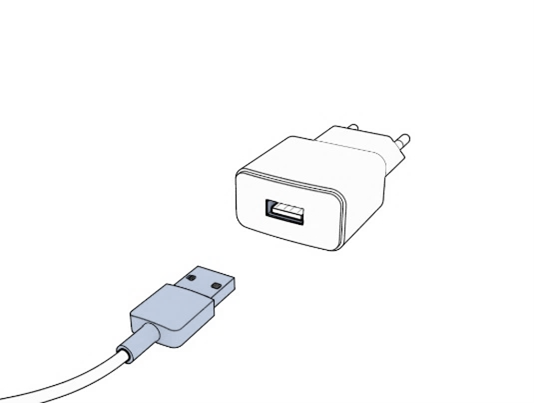
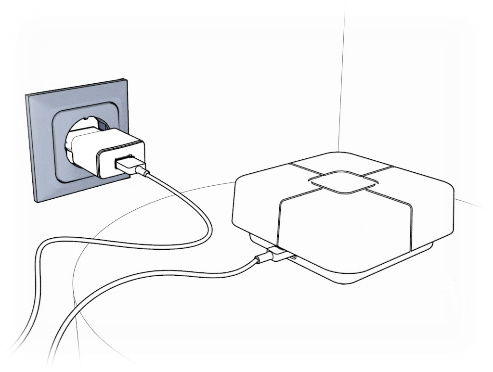
Take the power cable and connect it to the adapter with the USB-A connector as shown below.
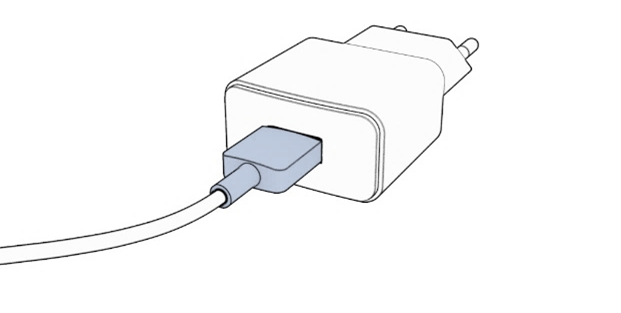
The power cable is now connected to the adapter at one end. The other side (the micro USB connector) can be connected to the AeroCount PM detector, as shown below.
Plug the adapter into a suitable socket. Caution: It is important that the voltage of the adapter corresponds to that of the electricity grid (in the Netherlands and Europe this is usually 230V), this prevents damage to the adapter.
Tip: Problems during this step may be prevented by using a laptop, rather than a mobile phone or tablet. Restarting the modem may also help.
You can use any device to install the AeroCount PM detector, as long as it can connect to Wi-Fi. After installation, the AeroCount (web)application can be opened on any device, regardless of which device is used for the initial installation.
On your computer, laptop, smartphone or tablet, go to the Wi-Fi (internet) settings, and follow these steps:
- Select the network with your device: AeroCount AirMonitor
If this network is not visible, see network selection in the FAQ at the bottom of STEP 5. - Enter the password aerocount (no capital letters, please note: some devices, such as mobile phones, sometimes capitalize automatically).
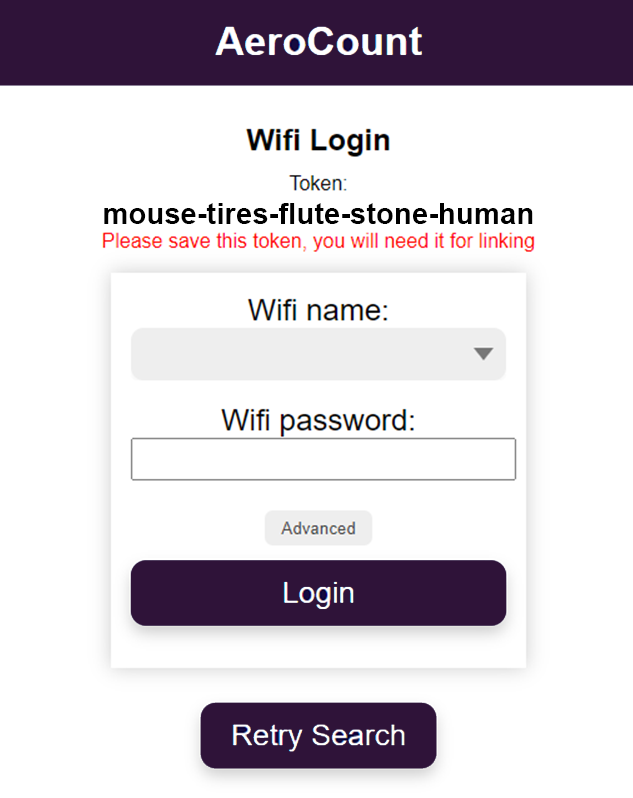
- Connect to the network, and wait for the pop-up screen of the image to the left (on a small screen you can find the image below) showing the five token words associated with your device. (In the example image these are: mouse-tires-flute-stone-human; on your device at home it will be a different combination of words.) Follow the steps indicated on the screen:
- Save the 5 token words you see on your screen. For example, you can write them down or take a screenshot of them. You need this combination of words to link your device to the (web) application and to view the data.
- Select your own Wi-Fi network under Wifi name:
This has to be a 2.4 GHz Wi-Fi network, and a detector can only be paired with one network at a time. (resetting allows you to pair to a different network) - Enter the password of your own Wi-Fi network under Wifi password:
- click on login.
- It may take a few minutes for the device to connect. As soon as the AeroCount PM detector has been connected correctly, the Status LED will light up continuously. (See FAQ/general description for the different lights the LED can show.)
If the device cannot be connected, see the "FAQ" section at the bottom of this step. - Open the AeroCount app: app.aerocount.nl
- Login or create an account.
- Click on add device in the app and add your AeroCount PM detector by entering the 5 token words belonging to your device, exactly as they were given to you.
Multiple devices can be connected by repeating this step.
Frequently Asked Questions (FAQ) for step 5
Network selection
"I don't see the AeroCount AirMonitor network?"
Check that the device with which you want to install the AeroCount PM detector has Wi-Fi functionality turned on, and that flight mode (airplane mode) is turned off. If this is the case, and you still experience problems, you can try the following 3 steps in order:
-
- Reset the AeroCount fine dust detector by pressing the reset button with a pen or other pointed object for at least 10 seconds, which is located on the bottom of the detector (see General description). If this does not solve the problem, see 2.
- Go to your saved networks and delete the Wi-Fi network AeroCount AirMonitor if you have saved it before. Then, if necessary, perform 1. again. If this does not solve the problem (after performing 1. again), see 3.
- Are you working on a mobile or tablet? Sometimes, it can help to install the device on a laptop (or computer with a Wi-Fi connection).
Network connection / device pairing
"The login pop-up screen does not appear?"
It can take some time for the pop-up screen to appear. If this has not happened after 30 seconds, you may have turned this function off in the settings of your device. As long as you are connected to the AeroCount Airmonitor network you can always access the login page by opening a browser and typing in the following address: 192.168.1.1
"Only an error appears, but no pop-up screen?"
It can take a while before the pop-up screen is loaded, sometimes causing an error page to appear. If the connection attempt is displayed in your notifications, you can usually refresh the page by clicking on it. This should then reopen the popup with the correct page. As long as you are connected to the AeroCount Airmonitor network, you can also manually access the login page by opening a browser and typing the following address: 192.168.1.1
"I don't know if the detector is connected to my Wi-Fi network?"
The AeroCount PM detector is not connected to the Wi-Fi if it is flashing in a '2-second off, 1-second on' pattern (see more information about the Status LED and flashing patterns under Using the device).
"I can't connect the detector to my Wi-Fi network?"
Make sure your Wi-Fi is working properly by using another device connected to your Wi-Fi network.
Check whether you have correctly remembered and entered your own Wi-Fi network password when connecting the AeroCount particulate matter detector to your Wi-Fi network. (For example, by forgetting the network on your computer/laptop/phone/tablet and reconnecting to your Wi-Fi network.)
Restarting the modem may fix this problem as well. Additionally, some people have more success by using a laptop rather than a mobile phone. Follow the next steps to restart your modem (source):
-
- Unplug the power and Ethernet cables from the modem. Some modems have backup batteries that need to be removed too.
- Wait 2-3 minutes for the modem to fully power off. All the lights on the modem should be off.
- Reconnect the power and Ethernet cables to the modem.
- Wait for the Internet light to turn solid, then check if the internet is working properly.
"I forgot my token words"
Resetting the detector, requires it to be reconnected to your Wi-Fi network. The 5 token words belonging to your device will be shown during the reconnection process.
"I entered my Wi-Fi password incorrectly"
Resetting the detector discards old settings and requires going through step 5 again (connecting to the Wi-Fi network), the Wi-Fi password will then need to be resubmitted. You can reset the detector by pressing the reset button with a pen or other pointed object for at least 10 seconds. The reset button is located on the bottom of the detector (see General description).
Status LED
"Why is my status LED always on?"
Congratulations! Your detector is correctly connected to your Wi-Fi network and the AeroCount server. You cannot disable this function. If this causes problems, please contact us.
Is your Status LED lit without flickering, but you do not see any data in the connected (web) application account? You have a unique situation that we have not encountered before, please contact us.
"Why is my Status LED blinking?"
The Status LED blinks when the device is on, but not connected to the internet (Wi-Fi).
If the flashing pattern is off for 2 seconds and on for 1 second, then the problem is within the detector – Wi-Fi system. For example, because the Wi-Fi password has not been entered correctly.
If the blink pattern is off for 5 seconds and on for 1 or 5 seconds, the problem is with the AeroCount server.
For more information about the Status LED see Using the device.
"Why is my Status LED off / Why is my Status LED not lit up?"
If the Status LED is not on (or blinking), the device is not connected to the electricity grid. (For more information about the Status LED, see Using the device.) Check that the adapter works and that the plug is connected correctly to the adapter and detector. Also, check that the power-socket is working. If this doesn't solve your problem, please contact us.
If problems continue with setting up your AeroCount PM detector, you can contact us here for the time being.
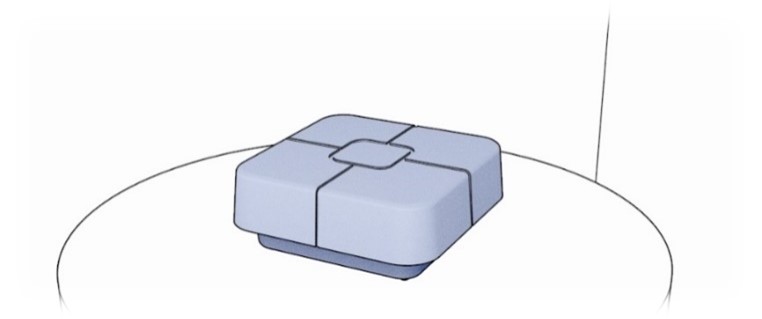
Place the device in a suitable spot, either horizontally (see option a) or vertically (see option b). In both cases, the device can be placed both indoors and outdoors. Warning: If you place the device outside, do so in a place where the AeroCount PM detector is protected against rain and sunlight. When placing or mounting the device outside, do so at least 50 centimetres above ground.
Option A: Place the PM detector horizontally on a flat surface
Leave a minimum of 5 centimeters free above and around the device to ensure an unobstructed air supply.
Optie B: Monteer de fijnstofdetector verticaal aan de muur
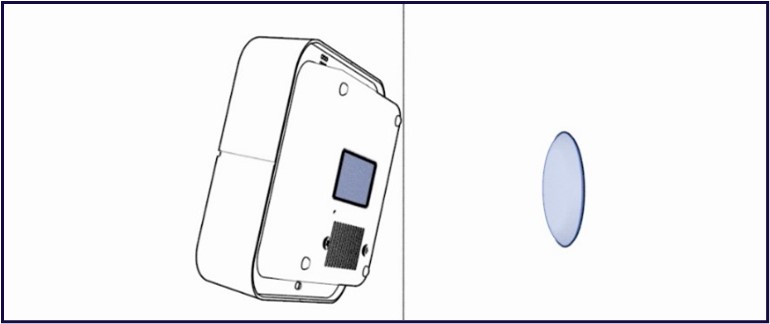
Take the supplied magnetic mounting plate (part 2 of the General description), and remove the protective film on the back. Choose where you want to mount the detector, make sure you leave about 5 centimetres of unobstructed airflow around the detector. Press the plate on this spot for at least 3 seconds.

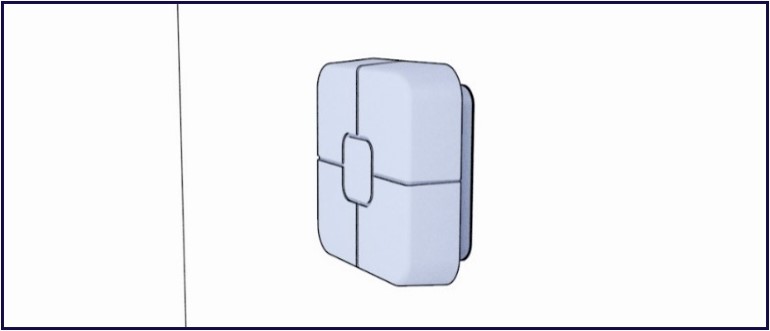
If the rectangular magnet (part 7 of the General description) has not yet been combined with the rectangular indentation at the bottom of the detector, first remove the film of the magnet, before pressing the magnet into the indentation for at least 3 seconds. Take the detector and hold it so that the Status LED and air outlet valve are at the bottom, then press the detector so that the magnet connects to the wall mount. The magnet is located in the centre at the back of the detector (part 7 of the General description) just above the air outlet cover.
The AeroCount PM detector works in combination with the AeroCount (web) application. The AeroCount fine dust detector must always be connected to the electricity grid by means of the supplied adapter and USB cable.
Status LED
The LED of the AeroCount PM detector shows the current function status of the device:
- The LED is off: the device is not connected to the electricity grid.
- The LED flickers on and off:
- 2 seconds off, 1 second on - the detector is on, but not connected to the internet (Wi-Fi).
There is a problem connecting your detector to your Wi-Fi network. - 5 seconds off, 1 second on - the detector is logging in on the server.
If this LED pattern persists there is probably a problem with the server. If this is the case, we will announce this as soon as possible on app.aerocount.nl. - 5 seconds off, 5 seconds on - the detector is connected to the Wi-Fi network and logged in to the server, but not yet connected to the server.
If this LED pattern persists there is probably a problem with the server. If this is the case, we will announce this as soon as possible on app.aerocount.nl. - The LED lights up continuously: the device is on and has a working internet connection (Wi-Fi)
- 2 seconds off, 1 second on - the detector is on, but not connected to the internet (Wi-Fi).
- The LED lights up continuously: the device is on and has a working internet connection (Wi-Fi)
The AeroCount PM detector automatically connects itself to the original Wi-Fi network when the connection is temporarily lost due to, for example, a power failure or an internet failure. The device continues measuring when offline and this data is uploaded and synchronized as soon as the device has re-established an active Wi-Fi connection.
If you struggle with setting up your AeroCount PM detector, you can contact us here for the time being.
Viewing measurement data
By linking your detector to your personal AeroCount (web)application (see STEP 5), you can view both current and historical measurement data on the (web)application. For additional information about the (web)application, see below.
(Web)application
It is possible to set an alarm via the application which will go off when the predefined particulate matter standards are exceeded. In addition, the application shows personal data in graphs, and it is possible to consult local and regional trends based on anonymized data. More information and an explanation about the operation of the app can be consulted via the help function in the AeroCount (web) application: app.aerocount.nl
Reset
The AeroCount PM detector can be reset by pressing the reset button on the back of the device for at least 10 seconds (see section 5 of the General description).
If this instruction page has not been sufficient to help install the AeroCount PM detector, our sincerest apologies! As you probably know, we're still in the early market introduction phase for our PM detector. We kindly ask you to contact us here for the time being. Any help to better our product and user experience will be greatly appreciated! We're sorry for any inconvenience this has caused you!